Welcome back to Thought Couture! Today's topic: HTML coding & photo shop! We're making custom navigation using photo links for your blog! Click Read More for the full instructions!
1. Make a plan
As silly as it may seem, this is one of the most important steps. Questions you need to ask yourself before you begin
1) How wide is my blog?
2) What colour scheme do I want to use?
4) What font(s) will I be using?
Once you figure out the answers to these questions, then we're really cooking with gas.
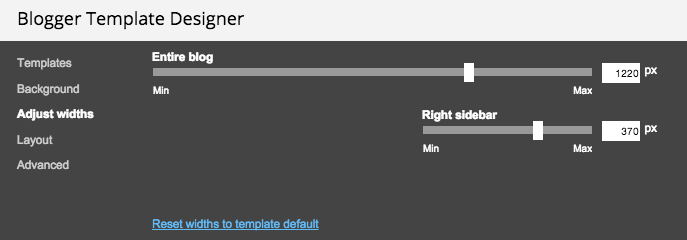
Hint: To find out how wide your blog is, go to customize blog template, and select "adjust widths" you need to make your navigation bar as wide as "entire blog."
2. Create the navigation bar in Photoshop.
Open Photoshop, and select File > New. Create a file with the same width as your blog, and a height that is roughly 60-100 pixels, depending on the look you want.
Then, create the headings you want in your navigation and space them out along the bar.
3. Separate the bar into links
So, since every word is going to link to a different page or label, they need to be separate images. To begin this process, you'll need to create sections with rulers. This can be done easily by clicking on the side bar rulers, and dragging across the screen to the desired point.
To make all of these selections different images, you will need to use the selection tool.
1) Use the rectangle selection tool, and select the area within the blue lines. It should automatically snap to the rulers.
2) Once selected, and the dotted line is surrounding the desired selection, hit CTRL C, then, CNTL N. This will copy your selection, and create a new document.
3) Once the "New Document" box pops up, simply hit ENTER.
4) And then, on the new canvas, hit CTRL V, to paste selection.
You will need to do this for each of the separate boxes on the navigation bar that you wish to be links. It's easiest later on if you label them either 1, 2, 3, etc, or an abbreviated version of the word, like FASH for instance, instead of Fashion.
4. Uploading the Photos
Following the above process in Photoshop, you will need to upload these photos to a Blogger post to begin the next section of the process.
Upload the photos as you usually would, and add all of them. (Preferably in order which you want them to appear on your navigation bar).
It is also important that you go through and select "Original Size" for all of them.
5. Arranging the Code
Next, open the "Layout" design tab in Blogger. Create a new gadget, and choose HTML/Java Script.
Now, being to copy and paste the HTML code for the images into the gadget box, in order.
Select ONLY the image code, which I have shown highlighted above.
This is what it should look like once you have all of the image codes pasted in order.
6. Adding the Links
Next we need to add the link code next to the image codes to complete the navigation bar.
At the beginning of each image code add,
<a href="http://URL HERE"> <img border=....
So, you will end up with something like this...
<a href="http://www.thoughtcouture.com"><img border="0" src="https://blogger.googleusercontent.com/img/b/R29vZ2xl/AVvXsEgfkshCh27UntKwU33wwEFu-j1k7djzND03zu1Iq_xqz202LYZEHWQt3-1-5yufm_C6QXOV9ztqM_ZGbMucbxn9mAyG8O2hRBewQ1A_pTLa9f1yJRQV5YCDD4RETdhUO0WaBBES7f1oWKQ/s1600/link1.png" />
Once you have all of the code in order, hit SAVE, and then go to the "Template tab"
7. Adjusting the Widths
So, when you first see your blog, you may be troubled to realize that the boxes don't line up, like this:
But worry not! Just select "adjust widths," and drag the bar until the entire navigation bar lines up.
8. Finished!
And that is the final step. Now all you have to do is go to your blog URL, and ensure that all of the links are working, and after that, revel in the glory that is your custom navigation bar! Congratulations!
Until next time,


No comments:
Post a Comment